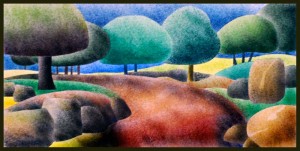
This is the finished abstract landscape watercolor painting. It is painted on 15 x 22 inches Arches cold press watercolor paper. More ink outline is drawn into the distance hills as I feel more texture is necessary to complete the overall feel of the painting. The ink outline was done using a permanent marker and I have been using the Ultra Fine Point Sharpie. I wonder if this is a good technique for stil life. When I do the outline after the water color wash has been lay down, I have to be careful not to over do it and also the flow and shape of the overall design. It is a good idea to do an area with the ink outline and place it on an art easel to view it for a period of time before you decide to do more. Once it is applied, there is no way to erase the permanent black lines.
Tag Archives: red
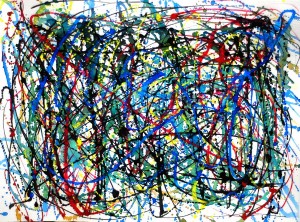
Daily watercolor painting – Jackson Pollock inspired study – Watercolor, Ink, Gouache painting
More color was added onto the watercolor study. This time blue gouache was diluted and painted on. The color of the gouache together with the watercolor underneath gives an illusion of distance and death to the painting. I will add more layers of color to experiment a variety of effect to this abstract painting technique. Lots of fun.
Daily Watercolor Painting – Loose Pear Study
Finished a 7 x 9 inches study of six pears in a group and wanted to try out the free and loose technique unique in watercolor painting. Sketch was done of the six pears on a cold press watercolor paper and big brush was used to layer in the background and pear color. It was done loosely and out of the sketch of the pears as you can see in the middle and lower part of the background. Orange color shows mixed with the background although the out line of the pear was always keep in mind as the first initial wash was done. Then after the first wash is dried to touch using a hair dryer, a second and third wash is applied and finally the pear take shape and the shadow and the stem was patinted quickly at various stages of dryness. It was fun and I have to work quickly to be free and loose. Next time I think I should have diluted the paint more with water and apply more layers until I get to the final stage.
Three pears – Watercolor painting final revision.
| Subscribe to dailywatercolor |
| Visit this group |
I have made a final revision on the 3 pears watercolor painting I did a while ago. The before and after picture is shown above. I have put on layers and layers of watercolor paint onto the painting while masking out the background or the pear. As done in the many other watercolor painting before, I have been using the watercolor spattering technique for this painting as well. This creates a effect I cannot get from watercolor painting using a brush and it is quite interesting with tiny little dots of paint similar to air brush. I found that I need to be not afraid of failure in making adjustment to my finished paintings. I need to treat it as a learning exercise in watercolor painting and even though if might turn out worse than before and yet I need to do it with faith and try to learn something in the process.
I have also uploaded two pictures of me in the Artist Statement page of this web site. One is taken in my studio in front of my table. It is my quite place for doing my watercolor. Another photo is taken with me standing beside my pebble painting.
Watercolor painting – Study of dry brush technique
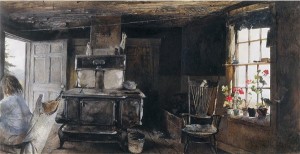
I have recently read an article written by Peter V. Nielsen on drybrush technique. The title of the article is Drybrush – a watercolour technique explored by Andrew Wyeth. I find it very interesting that Andrew Wyeth divide his watercolor into plain watercolor and dry brush. He might start with plain watercolor techique but changes partly or fully into this more expressive dry brush technique. After I read Peter Nielsen’s article and the Wood Stove painting by Andrew Wyeth in 1962, I want to try this myself but could not find much information on the web about this technique.
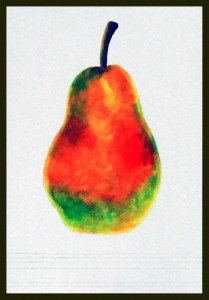
Then I found a site by an artist in Trento Italy called Ottorino De Lucchi. He has develope a dry brush technique over the years which allows the painting to maintain the brightness of the watercolor. I saw his paintings on the web and it amazes me with the detail and brightness of it that I want to try it myself. So I read his article on the technique which he generously share and started with a small study of a pear. I have started with the dry brush technique he mentioned with layers and layers of dry color right from the palette but the result was needless to say, quite disappointing. I have put layers upon layers of color to build it up as in Ottorino’s instruction but still I am not happy with the result. I found that this technique is very time consuming and I have much to learn and to study about this dry brush watercolor technique. Nevertheless I will try to finish this study in a few days and keep it as reference for my future watercolor technique. Well, here it is showing my unsuccessful attempt on learning the dry brush technique. I will write about it tomorrow and show my finish watercolor study tomorrow.
Watercolor Painting – Landscape
This 10 x 20 inches watercolor painting has been painted but there is much to be corrected. First of all there is a new experiment of putting on watercolor using colors without mixing. I try to use paint out from the tube and put in layers of watercolor paint from the lightest shade to the darkest without any mixing except on the paper itself. The lighter color was put on first and then when it is dry, the next layer of darker shade. The paint is not mixed but sometimes diluted with water to achieve a different intensity or value. As you can see from the rocks on the right, the color is more intense because I have use it right from the watercolor tube. The trick to this is not to mix any color and wait for one layer to dry before applying the next.
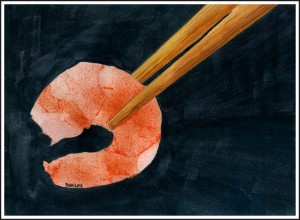
Daily Watercolor Painting – Shrimp and chopsticks
Shrimp and chopsticks is my latest daily watercolor painting. It is on a 7 x 10 inches cold press watercolor paper. I startated this painting doing the shrimp with several thin layer of watercolor wash on the whole shrimp. Then I tape the outline of the shrimp to restrict watercolor paint to not be accidentally get onto other areas. I then mixed a bright yellow orange color on my watercolor palette using Cadimum Orange and Yellow Ochre. Then the mixture is applied and flicked on with a tooth brush. Various areas of the shrimp is protected by paper shapes covering the area. It is a labor intensive process and it has to be done in several applications when after each application is completely dry. The chopstick is done second with layers of watercolor wash and eventually the darker wood lines are dry brushed on. After that the veins of the shrimp is added with more dots of the yellow red watercolor mixture. With the background still remaining to be painted, I have difficulty deciding what color to use because I do not want to leave it white. I started with a light green and found that it distracts from the subject. Then more layers was added and fiinally after many layters of watercolor wash, I ended up with this dark background.
Old Bicycle Watercolor Painting
I have continue to paint the bicycle painting last night. It takes a lot of time to get the deepest black possible. There is at least six layers of watercolor wash to get the dark I want. I want a variety of blacks and so as before, different mixes of Alizarin Crimson, French Ultramarine Blue and Windsor Green is used. The rust on the bicycle is lots of fun too although I feel that it might need a little of toning down because it looks too bright in some areas. Because of the detail of the subject, it takes a lot of time to paint just a little area. I am looking forward of painting the shadows and the background which I think should be lots of fun.


